
Lighting can make or break a photograph. Anyone who’s ever tried snapping the perfect shot knows that even the most stunning subject can look flat or uninteresting without proper illumination. But what exactly makes lighting “perfect,” and how can you consistently achieve it? Let’s explore the science and art behind it.
Understanding Light Quality
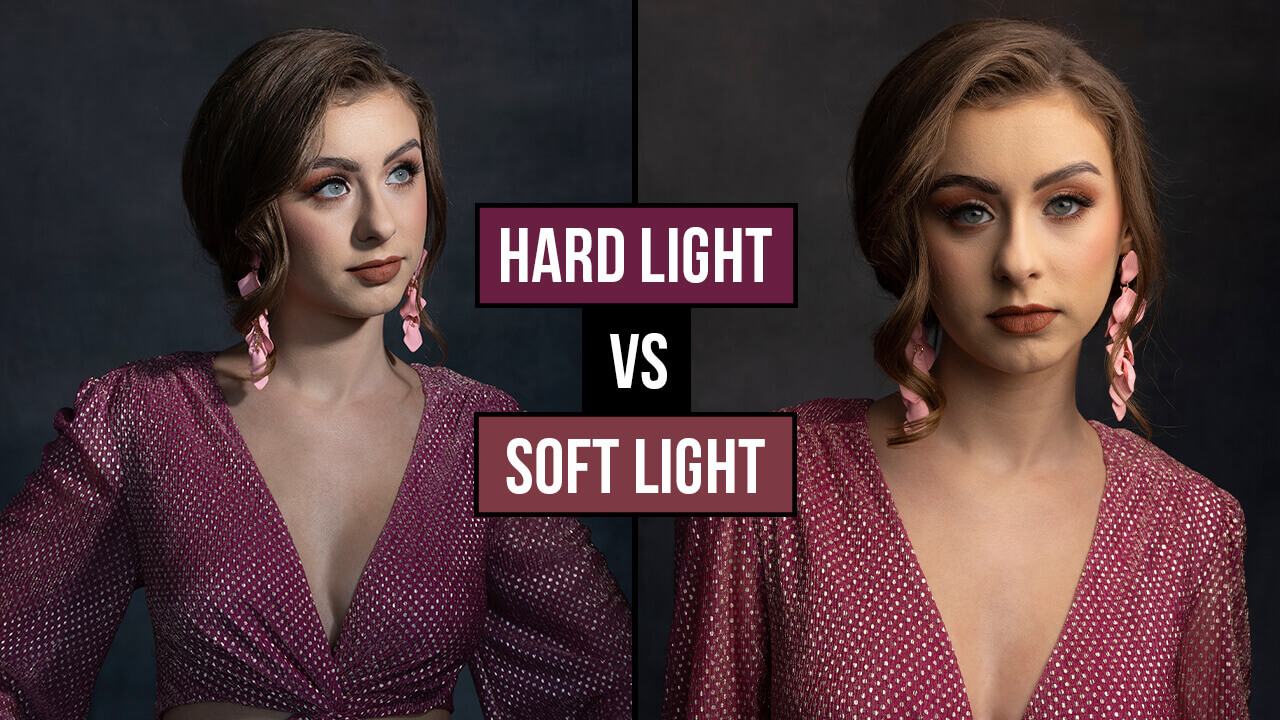
Not all light is created equal. Photographers often talk about hard vs. soft light. Hard light, like direct sunlight at noon, creates sharp shadows and high contrast. It can be dramatic, but also unforgiving. Soft light, on the other hand, scatters gently across your subject, producing a flattering and natural look. This is why professional portrait photographers often use diffusers, softboxes, or shoot during the golden hour—when the sun is low, and the light is naturally soft.
But light quality isn’t just about softness. Consider diffusion and reflection. Diffusers scatter light to reduce harsh shadows, while reflectors bounce light back onto the subject, filling in dark areas. Even a simple white poster board or a reflective surface can dramatically improve a shot. The key is to understand how light interacts with your environment.
Direction Matters
The direction from which light hits your subject can completely change the mood of a photo. Front lighting illuminates every detail but can make images look flat and two-dimensional. Side lighting emphasizes textures and shapes, giving depth and drama. Backlighting can produce stunning silhouettes or a glowing rim around your subject, creating a magical, ethereal effect.
Experimenting with angles, even just a few degrees, can turn an average photo into something extraordinary. For indoor photography, using windows or lamps positioned at different heights and angles can simulate professional lighting without expensive gear. For outdoor shoots, consider the sun’s position relative to your subject—not just height, but also angle and intensity.
Color Temperature and Mood
Light isn’t just about intensity—it has color. Measured in Kelvins, color temperature affects the mood and emotional impact of your photo. Warm tones (around 3000K) evoke coziness and intimacy, while cooler tones (5000K+) feel crisp, modern, or clinical.
Many smartphones and cameras allow you to adjust white balance, but understanding natural light color is invaluable. For example, late afternoon sunlight has a warmer, golden hue, perfect for portraits or lifestyle shots. Overcast days, meanwhile, provide naturally diffused light with cooler tones, ideal for product photography or macro shots where even lighting is crucial.

Practical Tips for Everyday Photography
The Role of Science in Lighting
Perfect lighting isn’t just intuition—it’s physics. Understanding how light travels, reflects, and refracts helps photographers make better decisions. For example, light intensity decreases with distance following the inverse square law, meaning moving your light source twice as far from the subject reduces its intensity to a quarter. Recognizing this principle allows precise control over brightness and contrast without over-relying on editing software.
Additionally, light polarization and diffusion through clouds or surfaces can affect color saturation and shadow sharpness. Photographers who observe and leverage these effects can produce images that feel vivid, natural, and professional.

Common Mistakes and How to Avoid Them
Even experienced photographers can struggle with lighting. Some frequent pitfalls include:Ignoring ambient light: Overpowering natural light with artificial sources can make colors look unnatural.
Flat lighting: Using only front-facing light without dimension can make subjects look two-dimensional.
Overexposure or underexposure: Relying solely on automatic camera settings can wash out highlights or lose shadow details.
The solution? Take control, experiment, and adjust. Learn your camera settings, understand natural light patterns, and practice using simple tools like reflectors and diffusers.
The Takeaway
Perfect lighting isn’t about expensive gear or complicated setups. It’s about understanding the qualities of light, experimenting with direction, color, and intensity, and learning how to manipulate them to serve your subject. Once you grasp the science behind lighting, every photo—whether it’s a quick smartphone snapshot, a family portrait, or a professional product image—has the potential to shine.
With patience, observation, and creativity, even amateur photographers can consistently capture images that look professional, evocative, and visually stunning. Light is not just illumination—it’s the heart and soul of every photograph.
Not all light is created equal. Photographers often talk about hard vs. soft light. Hard light, like direct sunlight at noon, creates sharp shadows and high contrast. It can be dramatic, but also unforgiving. Soft light, on the other hand, scatters gently across your subject, producing a flattering and natural look. This is why professional portrait photographers often use diffusers, softboxes, or shoot during the golden hour—when the sun is low, and the light is naturally soft.
But light quality isn’t just about softness. Consider diffusion and reflection. Diffusers scatter light to reduce harsh shadows, while reflectors bounce light back onto the subject, filling in dark areas. Even a simple white poster board or a reflective surface can dramatically improve a shot. The key is to understand how light interacts with your environment.
Direction Matters
The direction from which light hits your subject can completely change the mood of a photo. Front lighting illuminates every detail but can make images look flat and two-dimensional. Side lighting emphasizes textures and shapes, giving depth and drama. Backlighting can produce stunning silhouettes or a glowing rim around your subject, creating a magical, ethereal effect.
Experimenting with angles, even just a few degrees, can turn an average photo into something extraordinary. For indoor photography, using windows or lamps positioned at different heights and angles can simulate professional lighting without expensive gear. For outdoor shoots, consider the sun’s position relative to your subject—not just height, but also angle and intensity.
Color Temperature and Mood
Light isn’t just about intensity—it has color. Measured in Kelvins, color temperature affects the mood and emotional impact of your photo. Warm tones (around 3000K) evoke coziness and intimacy, while cooler tones (5000K+) feel crisp, modern, or clinical.
Many smartphones and cameras allow you to adjust white balance, but understanding natural light color is invaluable. For example, late afternoon sunlight has a warmer, golden hue, perfect for portraits or lifestyle shots. Overcast days, meanwhile, provide naturally diffused light with cooler tones, ideal for product photography or macro shots where even lighting is crucial.
1. Use reflectors creatively: Even a simple white poster board, a silver tray, or aluminum foil can bounce sunlight or lamp light onto your subject, filling in shadows.
2. Avoid harsh overhead light indoors: Ceiling lights cast unflattering shadows. Position lamps at eye level or slightly above to emulate natural sunlight.
3. Golden hour magic: The hour after sunrise or before sunset offers soft, warm light that flatters nearly every subject and produces a dreamy atmosphere.
4. Embrace shadows: Shadows aren’t your enemy—they add depth, contrast, and texture. Learning to balance light and shadow is a hallmark of advanced photography.
5. Experiment with mixed lighting: Combining natural light with indoor lamps or LED panels can create interesting effects and highlight textures in creative ways.
6. Observe reflections: Light reflects off surfaces like walls, floors, and water. Adjusting your shooting angle to incorporate or avoid these reflections can dramatically change your shot.
Perfect lighting isn’t just intuition—it’s physics. Understanding how light travels, reflects, and refracts helps photographers make better decisions. For example, light intensity decreases with distance following the inverse square law, meaning moving your light source twice as far from the subject reduces its intensity to a quarter. Recognizing this principle allows precise control over brightness and contrast without over-relying on editing software.
Additionally, light polarization and diffusion through clouds or surfaces can affect color saturation and shadow sharpness. Photographers who observe and leverage these effects can produce images that feel vivid, natural, and professional.
Common Mistakes and How to Avoid Them
Even experienced photographers can struggle with lighting. Some frequent pitfalls include:Ignoring ambient light: Overpowering natural light with artificial sources can make colors look unnatural.
Flat lighting: Using only front-facing light without dimension can make subjects look two-dimensional.
Overexposure or underexposure: Relying solely on automatic camera settings can wash out highlights or lose shadow details.
The solution? Take control, experiment, and adjust. Learn your camera settings, understand natural light patterns, and practice using simple tools like reflectors and diffusers.
The Takeaway
Perfect lighting isn’t about expensive gear or complicated setups. It’s about understanding the qualities of light, experimenting with direction, color, and intensity, and learning how to manipulate them to serve your subject. Once you grasp the science behind lighting, every photo—whether it’s a quick smartphone snapshot, a family portrait, or a professional product image—has the potential to shine.
With patience, observation, and creativity, even amateur photographers can consistently capture images that look professional, evocative, and visually stunning. Light is not just illumination—it’s the heart and soul of every photograph.
Tags:
Index